SamSifter Manual
Contents
- SamSifter Manual
- Detailed Installation Instructions
- Creating and Editing Workflows
- Executing Workflows
- Loading and Saving Workflows
- Export to Bash scripts
- Manuals for Filters and Tools
- Common Options
- Count reads per taxon
- Filter reads by conservation
- Filter reads by list of QNAMES
- Filter references by evenness of coverage
- Filter references by % identity
- Filter references by list of accessions
- Filter references by PMD score
- Filter taxa by list of taxon IDs
- Filter taxa by PMD score
- [GNU gzip] Compress file
- [GNU gzip] Decompress file
- [PMDtools] Calculate PMDS
- [PMDtools] Filter reads by % identity
- [PMDtools] Filter reads by PMDS
- [SAMtools] Convert BAM to SAM
- [SAMtools] Convert SAM to BAM
- [SAMtools] Remove duplicates
- [SAMtools] Sort by coordinates
- [SAMtools] Sort by query names
- [BetterRMDup] Remove duplicates
- Statistical Summaries
Detailed Installation Instructions
SamSifter is written in Python3, so it runs on Windows, Mac OS X and GNU/Linux as long as you have installed a working Python3 interpreter. It requires the additional packages PyQt4 to display the GUI, numpy for vectorized calculations, pandas for statistical summaries, and matplotlib to plot optional coverage and read lengths distributions. The Python setup tools normally take care of these requirements for you, however at time of writing the package PyQt4 is not available in the PyPI repositories so you have to install it using your operating system’s package management.
If you already have a working Python3 installation with all required packages you can skip the following section.
Installing Python3 and PyQt4
Below you can find tested installation instructions for Debian-based GNU/Linux distributions. The package names for other Linux distributions should be very similar though. The Windows installation has only been tested on a 32-bit Windows XP installation (currently the only test system available). The installation instructions for Mac OS X are likely incomplete as they could not be tested at all.
Debian 8 (jessie) and newer or Ubuntu 14.04 and newer
The preparation of the SamSifter installation on Debian 8 (jessie) and newer or Ubuntu 14.04 and newer is very simple as all packages are already available in the standard repositories:
sudo aptitude install python3 python3-dev python3-setuptools python3-pip python3-nose python3-pyqt4 python3-numpy python3-matplotlib python3-pandas
The installation of a variety of SAM processing tools is optional, but highly recommended:
sudo aptitude install parallel samtools picard-tools gzip
You can now proceed with the actual SamSifter installation.
Older Debian or Ubuntu systems
Older Debian/Ubuntu systems provide only a rudimentary Python3 environment lacking the matplotlib package. We have to use the Python tools easy_install and pip to obtain it. The following steps have been tested successfully on Ubuntu 12.04:
  # install Python3 system (as far as possible)
  sudo aptitude install python3 python3-dev python3-setuptools python3-nose python3-pyqt4 python3-numpy python3-tornado libfreetype6-dev
# optional: install various SAM processing tools
sudo aptitude install parallel samtools picard-tools gzip
  # install pip for Python3
  sudo easy_install3 -U distribute
  sudo easy_install3 pip
  # matplotlib is not yet available, thus we install it from PyPI
  sudo pip3 install matplotlib==1.3.1
  # same for pandas
  sudo pip3 install pandas==0.14.1
You can now proceed with the actual SamSifter installation.
Mac OS X using Homebrew
Using Homebrew, the “missing package manager for OS X”, seems to be the easiest way to obtain an up to date Python3 system including PyQt4 on a Mac. Install Homebrew by pasting the following command into a Terminal prompt:
ruby -e "$(curl -fsSL https://raw.githubusercontent.com/Homebrew/install/master/install)"
and follow the on-screen instructions. Once you have checked that the system is functional with
brew doctor
you can install these packages with the following commands (current versions at time of release according to Braumeister):
brew install python3        # current version: 3.4.2
brew install pyqt           # current version: 4.11.3
brew install pkg-config     # current version: 0.28
Open a fresh Terminal window, confirm that it uses the newly installed Python3 interpreter at /usr/local/bin/python by running
which python
and continue to install additional Python packages with the built-in package management:
# install pip
easy_install -U distribute
easy_install pip
# install setuptools, numpy and matplotlib
pip install setuptools
pip install numpy
pip install matplotlib==1.3.1
pip install pandas==0.14.1
You can now proceed with the actual SamSifter installation.
Windows (32 bit)
For any Windows system the use of a packaged Python 3.4 distribution like Anaconda from http://continuum.io/downloads#all is recommended. However, if you’d rather install the individual packages by yourself you can follow these steps. The following instructions have been tested successfully on Windows XP (32 bit):
- Download and install Python from https://www.python.org/downloads/windows/. The recommended version is Python 3.4.2. During installation, make sure to include pip in the installation and check the option to automatically add python.exe to your PATH.
- Download and install PyQt4 from http://www.riverbankcomputing.com/software/pyqt/download. The recommended version is PyQt 4.11.3 for Python 3.4 and Qt 4.8.6.
- Download and install numpy from http://www.numpy.org/. The recommended version is numpy 1.9.1 for Python 3.4.
- Download and install matplotlib from http://www.matplotlib.org/. The recommended version is matplotlib 1.4.0 for Python 3.4.
- Download and install pandas from http://www.lfd.uci.edu/~gohlke/pythonlibs/#pandas. The recommended version is pandas 0.15.2 for Python 3.4.
You can now proceed with the actual SamSifter installation.
Installing SamSifter
Once you have a working Python3 environment use an administrator account to download and install the current SamSifter package on your system with the command:
pip3 install SamSifter
Previous versions will be uninstalled automatically. The installation can be tested with
samsifter --help
If everything went fine you should see the following help text:
usage: samsifter [-h] [-v] [-d]

SamSifter helps you create filter workflows for next-generation sequencing
data. It is primarily used to process SAM files generated by MALT prior to
metagenomic analysis in MEGAN.

optional arguments:
  -h, --help     show this help message and exit
  -v, --verbose  print additional information to stderr
  -d, --debug    show debug options in menu
Starting the program without any arguments will display the GUI and let you edit your first workflow.
Uninstalling SamSifter
To get rid of SamSifter simply execute the following command as administrator:
pip3 uninstall SamSifter
The Python utility pip3 will list all currently installed available versions for selective removal. Proceed similarly with any required packages (e.g. matplotlib) if you don’t need them anymore.
Creating and Editing Workflows
Workflows are displayed and edited in the central part of the SamSifter window:
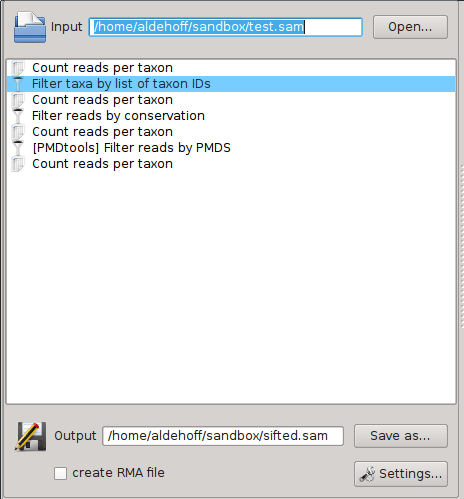
A workflow consists of three parts:
- An input file in SAM or BAM format (optionally zipped) which can be specified in the upper part of the main window.
- A list of one or more tools and filters that are executed in a specific order. They are shown in the central part of the main window and can be freely rearranged, added and removed.
- An output file in SAM or BAM format (again optionally zipped to save space), which similar to the input file can be specified in the lower part of the main window. This part also contains options to enable the generation of RMA files for MEGAN.
When working with SamSifter for the first time all of these fields and lists will be empty and waiting for you. To get back to this pristine state simply click the [New] button to create a new empty workflow. Any changes to your current workflow will be discarded unless you follow the prompt to save them.
See also
We’ll now take a closer look at each of these three parts.
Selecting an Input File
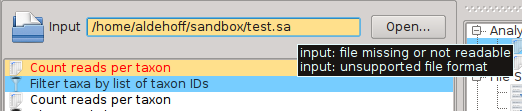
SamSifter supports input files in the SAM or BAM format, both compressed or uncompressed. Some of the filters included in SamSifter may have additional requirements for the sort order of the reads or optional annotations like headers and MD tags. The input file can either be determined by typing the full path into the text field or by clicking the [Open...] button and selecting the file using a standard file open dialog.
SamSifter automatically checks if the file a) exists, b) is readable and c) has the correct file type. The text field containing the file path will be highlighted in orange to show you if any of these conditions are not fulfilled. Hovering the mouse cursor over the text field shows a tooltip with hints how to resolve the error.
Adding and Removing a Tool or Filter
SamSifter includes a variety of filters and tools that can be used to process your input file. You can add one to the workflow by selecting it from either the [Edit] > [Add Filter...] menu or double-clicking an entry in the Filters and Tools dock.
![The Filters and Tools dock lists all available filters and tools by category. Press F2 to show it or activate it in the **[View]** menu.](_images/filters_dock.png)
You can toggle the dock on and off by pressing F2 or activating it in the [View] menu.
The new entry is added to the currently selected row of your workflow or appended to the end if no row is selected. To remove the entry click [Edit] > [Delete] or press the Delete key.
Rearranging Tools and Filters
The order of steps in the workflow can be freely rearranged by selecting any entry and moving it up or down. To move an entry click [Edit] > [Move up] / [Edit] > [Move down], click the corresponding toolbar buttons, or use the keyboard shortcuts Ctrl+Up and Ctrl+Down.
SamSifter validates the entire workflow after each change. Individual steps in the workflow may have specific requirements for the type of input they accept and/or the type of output they produce. If any of these requirements are not fulfilled the color of the corresponding entry will change to orange and a message will appear in the Messages dock with hints on how to resolve these errors.
![The Messages dock shows error messages and hints on how to resolve them. Press F3 to show it or activate it in the **[View]** menu.](_images/messages_dock.png)
You can toggle the dock on and off by pressing F3 or activating it in the [View] menu.
Displaying and Editing Filter Settings
Most tools and filters in your workflow have settings that are required for the tool to function properly as well as optional settings that can tweak the functionality. The Filter Settings dock serves to show these settings along with a description of the tool and a summary of its input and output requirements.
![The Filter Settings dock shows error messages and hints on how to resolve them. Press F4 to show it, or activate it in the **[View]** menu, or double-click any workflow entry.](_images/settings_dock.png)
You can toggle the dock on and off by pressing F4, activating it in the [View] menu or simply double-clicking the workflow step you are interested in. The individual settings have tooltips that provide more information on their meaning and effect.
See also
The available options depend on the tool or filter. Please see Manuals for Filters and Tools for details.
Selecting an Output File
SamSifter supports output files in the SAM and BAM formats, both compressed and uncompressed. The output file can either be determined by typing the full path into the text field or by clicking the [Save as...] button and selecting the new filename using a standard file save dialog.
Similar to the input field, the program automatically checks if the target directory a) exists, b) is readable and c) if the new file has the correct file type. The text field containing the file path will be highlighted in orange to show you if any of these conditions are not fulfilled. Hovering the mouse cursor over the text field shows a tooltip with hints how to resolve the error.

Optional: Creating an RMA file for MEGAN
SamSifter can automatically create a RMA file from SAM output files if a recent version of MEGAN (version 5.8.3 or newer) including the SAM2RMA tool is installed on your computer. The tool can be configured by clicking the [Settings...] button.
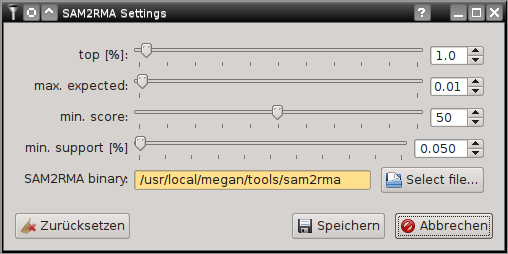
For details on the effect of the individual setting see the MEGAN manual or the SAM2RMA help function. Clicking the [Restore defaults] button will revert your changes to the default settings.
Note
The default settings here are recommended by the Krause Lab and may differ from the MEGAN default settings!
If the path to the SAM2RMA binary is highlighted orange you may have to update the installation path or change the file permissions to make the program executable.
Executing Workflows
Once a workflow is properly set up with input file, a list of tools or filters to run and an output file you can run the entire workflow on your computer.
See also
Export to Bash scripts if you’d like to process more than one file at a time or run the workflow using the command line of another computer.
Running a Workflow
To run a workflow simply click the [Run] button in the toolbar or choose [Run] > [Run] from the menu. This button may be disabled in two situations:
- if your workflow has errors that need to be addressed -> take a closer look at entries with orange highlighting to resolve the errors, then try again.
- if another workflow is currently being processed -> wait for it to finish or click [Stop] to stop it, then try again.
Log Messages
Once the workflow is being executed the [Messages] dock will pop up and show a bunch of messages:

Depending on your workflow and settings there will be
- Status messages in black, eg. the current status and process ID.
- Info messages in green; they’re enabled by default but can be disabled for each step by disabling the individual verbose options if you don’t like the noise.
- Warnings in yellow; they’re usually harmless and SamSifter will continue to process the workflow but you may want to review these warnings to see if they affect the expected results.
- Errors in red; SamSifter will attempt to abort the processing immediately if it encounters an error.
Stopping a Workflow
If you notice that you made a mistake or that the processing doesn’t work as expected you can abort the run by pressing the [Stop] button at any time. Depending on your workflow this may leave temporary files in your work directory that should be removed manually to not affect the next run.
Loading and Saving Workflows
SamSifter uses a simple XML file type with the extension ssx (SamSifter XML) that is human- and machine-readable can be opened and edited in any text editor.
Use the [Open] button or the corresponding entry [File] > [Open] in the menu to open a workflow file located on your computer or network.
To save your workflow to a SSX file you can click the [Save] button in the toolbar or choose the corresponding entry [File] > [Save] in the menu. Similarly, use [File] > [Save as...] to save a copy of your current workflow to a new file with different filename.
The [File] menu lists up to 10 recently used files for quicker access.
Export to Bash scripts
If processing one SAM file at a time is not enough anymore and you want to move to large-scale processing of many files with an established workflow, maybe even on bigger hardware with more CPU cores and RAM, then exporting your workflow to a Bash script may be the next step.
All tools and filters included in SamSifter can also be executed as stand-alone scripts on the commandline interface (CLI). To create a Bash script that can call these commands similar to the graphical user interface (the SamSifter GUI) simply click the [Export] button or select it from the [Run] > [Export to Bash] menu. A dialog with several options will pop up, allowing you to choose between three distinct types of processing modes and giving you three addtional settings for Bash options (eg. to print all executed commands, to shorten long file paths to just the filename and/or to stop on errors):
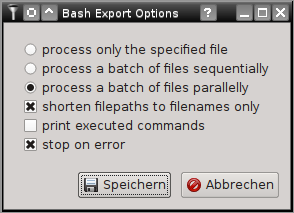
The available processing modes are:
- Single Mode processes only the specified input file and produces the specified output file similar to running the workflow in the GUI. This mode should be used with unmodified filenames unless all input files are located in the same directory as the exported bash script.
- Sequential Mode processes a list of arbitrary input files one file after another and saves the output to files renamed with the filename extension sifted. This mode should be used with shortened filenames unless all of the required list files (CSV) are available at identical paths from all machines that this script is deployed to.
- Parallel Mode speeds up the process significantly by distributing jobs across all available CPU cores and running them in parallel. This requires the installation of GNU parallel. Similar to sequential mode above it should be used with shortened filenames unless all of the required list files (CSV) are available at identical paths from all machines that this script is deployed to.
Clicking the [Save] button lets you choose the name and location of the new Bash script. Of course you can open this script in any text editor and modify it to fit your needs. To execute the script you need to make it executable first:
chmod +x example.sh
then run it with the command
./example.sh one.sam two.sam three.sam
to process three different input files with the same example workflow. The number of input files is unlimited and they can be located anywhere on your computer or the network. The usual Bash wildcards like * and ~ can be used:
./example.sh ~/test_dir/*.sam
would process all SAM files located in a directory called test_dir in the user’s home directory. If you have chosen the option to shorten filepaths to filenames only you need to keep any additional files like taxon lists or other CSVs in the same directory as the Bash script.
Running a Bash script that uses GNU parallel will show a summary of currently running jobs, the number of available CPU cores, the average time per job as well as an update on the estimated time until completion of all jobs (only available once the first jobs have finished).
Manuals for Filters and Tools
Common Options
SamSifter includes a suite of built-in filters as well as wrappers for external tools which are characterized by the name of the underlying tool in square brackets (eg. [SAMtools] or [PMDtools]). All of the built-in filters and also some of the wrappers share a set of general options:
- filter direction has two possible settings: one keeps all entries in the analyzed file that match the filter requirements, the other discards these entries. By default all filters use the discard setting, but in case of eg. a pathogen screening with a small list of interesting taxon IDs it may be useful to invert this in order to keep all reads that map to a pathogen of interest.
- verbose is activated by default and provides additional information on the filter process. It can be safely deactivated, resulting in less noise in the messages dock and shorter log files on the command-line interface.
- debug is deactivated by default and prints information to the command-line which may help with troubleshooting and debugging the program. It is only useful to software developers.
Count reads per taxon
This analysis step will not alter the input file but count the number of reads assigned to each taxon ID. The results are stored to a temporary statistics file as comma-separated values (CSV) with taxon IDs in column taxon_id and the read counts in column read_count.
Up to 1000 of these steps can be included in a workflow to compare read counts between arbitrary filtering steps. The temporary files as well as the corresponding read count columns will be enumerated from 000 to 999 and compiled into one large spreadsheet during post-processing.
See also
Filter reads by conservation
This filter identifies reads mapping to the references of multiple taxa with similar alignment scores. It is useful when dealing with reads mapping to highly conserved or orthologous genes that are shared across multiple taxa. The filter requires you to specify the permitted deviation from the maximal alignment score (default is 5) and the maximum number of taxa that a read can be mapped to within this range of alignment scores before it gets excluded (default is 10).
Filter reads by list of QNAMES
This filter is used to remove specific reads from a SAM file by using a list of unique read identifiers (so-called QNAMES or query names). The list should be formatted as tab-separated CSV file and list the query names in the first column without headers. Any additional columns will be ignored.
Filter references by evenness of coverage
This filter analyses the distribution of read bases to reference bases to calculate the Gini coefficient for each reference, then filters all references exceeding the given maximimal Gini threshold (default 0.90) to achieve a higher prevalence of evenly covered references.
The filter can be further restricted to only consider references with average coverage falling within a certain range. By default the range is set from 0x minimal to 9999x maximal coverage, hence the thresholds have no effect. However, because the Gini coefficient is a measure of relative inequality it may have less significance for references with low minimum coverage, which can be effectively excluded from filtering by setting a corresponding minimum coverage.
By default all reference bases are considered, but the calculation of coverage and read length distributions can optionally be restricted to only the covered bases (coverage >= 1).
What is the Gini coefficient?
The Gini coefficient is often used as a metric for the relative inequality of income distribution across the population, however it can also be applied to describe the heterogenity of the distribution of read bases to reference bases (= the coverage distribution). This makes it a useful tool when dealing with references that show distinct peaks in their coverage plot due to large clusters of reads that map to few conserved areas while leaving the larger part of the reference sequence uncovered.
Given the normed cumulative coverage distribution of all covered reference bases (= a Lorenz curve) the Gini coefficient describes the ratio of the area A between the Lorenz curve and the diagonal (describing a perfectly even distribution of read bases) over the total area B underneath the diagonal. Thus, a completely even distribution of read bases across the entire reference would have a minimal Gini coefficient of 0.0 while a completely uneven distribution with all read bases mapped to just one reference base would have a maximal Gini coefficient of 1.0.
Experimental options
This filter can also be used to analyze the read length distribution per reference (disabled by default) and to plot coverage and read length distributions (also disabled by default).
Warning
Activating the plotting of these distributions for a large input dataset can create I/O problems due to the large amounts of PNG files generated. It will also decrease the performance of this filter considerably and should only be used to troubleshoot filter parameters for small subsets of the data.
Filter references by % identity
This is a two-step filter that first determines the number of reads mapping to a reference with at least 90% identity, then identifies those references with at least 50% reads passing the first threshold. Both filter settings can be changed individually and the thresholds can also be set as upper instead of lower limits. By default all references fulfilling the filter criteria are discarded.
Note
The % identity calculation is based on information in the CIGAR string and the optional MD tag and will fail if the SAM file contains no header.
Filter references by list of accessions
This filter is used to remove specific reads from a SAM file by using a list of unique accessions. The list should be formatted as tab-separated CSV file and list the accessions in the first column without headers. Any additional columns will be ignored. By default all reads mapping to an accession in the list will be discarded.
Filter references by PMD score
This is a two-step filter that calculates the post-mortem degradation score for each read and in first step determines the number of ancient reads (PMDS at least 3) mapping to a reference, then identifies those references with at least 50% reads passing the first threshold. Both filter settings can be changed individually. By default all references fulfilling the filter criteria are discarded.
Note
The PMD score calculation is based on information in the CIGAR string and the optional MD tag and will fail if the SAM file contains no header.
Filter taxa by list of taxon IDs
This filter is used to remove specific taxa from a SAM file by using a list of unique NCBI taxon IDs. The list should be formatted as tab-separated CSV file and list the taxon IDs in the first column without headers. Any additional columns will be ignored. By default all reads mapping to a taxon in the list will be discarded.
Filter taxa by PMD score
This is a two-step filter that calculates the post-mortem degradation score for each read and in first step determines the number of ancient reads (PMDS at least 3) mapping to a taxon, then identifies those taxa with at least 50% reads passing the first threshold. Both filter settings can be changed individually. By default all references fulfilling the filter criteria are discarded.
Note
The PMD score calculation is based on information in the CIGAR string and the optional MD tag and will fail if the SAM file contains no header.
[GNU gzip] Compress file
This wrapper for GNU gzip compresses any uncompressed file. It should be used only once towards the end of a workflow as frequent compression and decompression between steps can slow processing down.
This step will simply execute the command
gzip -cf
and has no additional options.
[GNU gzip] Decompress file
A wrapper for GNU gzip that decompresses any zipped file. It should be used only once towards the start of a workflow as frequent compression and decompression between steps can slow processing down.
This step simply runs the command
gzip -d
and has no additional options.
[PMDtools] Calculate PMDS
This wrapper for a modified version of PMDtools does not have any filter functionality but simply calculates the post-mortem degradation score for each read and writes it into a custom DS tag by running the command
pmdtools_mod --dry --writesamfield --header
Following PMDtools steps in the workflow will utilize these tags and skip the calculation to save time.
PMDtools can only calculate post-mortem degradation scores for SAM files which contain a complete header with CIGAR strings and optional MD tags because it has to reconstruct the reference sequence from these fields. The tool can optionally write a brief statistical summary to the Messages dock when done, however this is disabled by default.
See also
Skoglund et al. (2014) for details on the calculation of post-mortem degradation scores and the original version of PMDtools.
[PMDtools] Filter reads by % identity
This filter is a wrapper for a modified version of PMDtools that targets reads with insufficient identity to their respective reference sequence. Any reads with identity values below the set minimum threshold (default is 0.95 = 95%) will be discarded.
Note
The calculation of identity according to PMDtools ignores indels, possibly deaminated bases as well as unknown bases (Ns). In order to achieve compatibility with MALT and other tools that include all of these in their calculation the three corresponding options have to be activated.
PMDtools can only calculate identity values for SAM files which contain a complete header with CIGAR strings and optional MD tags because it has to reconstruct the reference sequence from these fields. The tool can optionally write a brief statistical summary to the Messages dock when done, however this is disabled by default.
See also
Skoglund et al. (2014) for the original version of PMDtools.
[PMDtools] Filter reads by PMDS
This filter uses a modified version of PMDtools to calculate the post-mortem degradation score (PMDS) for each read and discards all reads with scores below the set threshold.
PMDtools can only calculate post-mortem degradation scores for SAM files which contain a complete header with CIGAR strings and optional MD tags because it has to reconstruct the reference sequence from these fields. The tool can optionally write a brief statistical summary to the Messages dock when done, however this is disabled by default.
See also
Skoglund et al. (2014) for details on the calculation of post-mortem degradation scores and the original version of PMDtools.
[SAMtools] Convert BAM to SAM
This is a simple wrapper for SAMtools view which converts the binary BAM format to the text-based SAM format by running the command
samtools view -
The option to also print the SAM header (-h on the command-line interface) is enabled by default, as the information in those header lines is crucial for most of SamSifter’s filters.
[SAMtools] Convert SAM to BAM
This is a simple wrapper for SAMtools view which converts the text-based SAM format to the binary BAM format by running the command
samtools view -S -b -
The output is compressed by default but compression can be disabled to speed up the following steps. This is only recommended when all following steps are part of the SAMtools suite as well.
[SAMtools] Remove duplicates
This wrapper for SAMtools rmdup removes duplicate reads with identical start coordinates from BAM files by running the command
samtools rmdup - -
By default single-end reads are included in duplicate removal. Paired-end reads can optionally be treated as single-end reads.
See also
[BetterRMDup] Remove duplicates for the improved capabilities of Alexander Peltzer’s BetterRMDup tool
[SAMtools] Sort by coordinates
This wrapper for SAMtools sort sorts entries in a BAM file by their coordinates by running the command
samtools sort - tmp -o
and has no additional options. Sorting uses a temporary file with prefix tmp that will briefly occupy additional storage space in the current work directory if the whole alignment does not fit into memory.
[SAMtools] Sort by query names
This wrapper for SAMtools sort sorts entries in a BAM file by their query names (unique read identifiers) by running the command
samtools sort -n - tmp -o
and has no additional options. Sorting uses a temporary file with prefix tmp that will briefly occupy additional storage space in the current work directory if the whole alignment does not fit into memory.
[BetterRMDup] Remove duplicates
This wrapper for Alexander Peltzer’s BetterRMDup removes duplicate reads from BAM files and improves upon the SAMtools rmdup tool by considering both the start and the stop coordinates. It runs the command
betterrmdup -
which itself is a wrapper for
java -jar BetterRMDup.jar -
The tool currently provides no further options.
See also
[SAMtools] Remove duplicates for the original SAMtools rmdup
Statistical Summaries
Summaries of read counts before or after any step in a workflow can easily be created by including one or more analysis steps (eg. Count reads per taxon) in the workflow.
Compiling Results Per Analysed File
Each of these steps will create a temporary CSV file that is removed once the data have been automatically compiled into a spreadsheet at the end of a workflow. The tool responsible for this compilation is called compile_stats. By default it is included in the post-processing of every SamSifter workflow. It produces one CSV file for each analysed SAM file with tab-separated columns: the first column contains the taxon IDs, the following columns the read counts - one for each analysis step that was included in the workflow. If no temporary files are found it does nothing.
The statistics can be used to validate filter settings or their order and evaluate the impact on size and composition of the filtered SAM file. One example: If you are in doubt which threshold for a filter setting is going to give the expected result you can create a cascade of filter steps, each with slightly stricter thresholds than the previous and each followed by an analysis step. By running the workflow once and looking at the resulting spreadsheet you can then pinpoint the one filter threshold at which only the required entries are left in the file. Your final workflow will then contain only one filter step with this exact threshold and may even leave out the analysis step to save time.
Comparison of Multiple Files
When you repeat a workflow with different SAM files or use a Bash script to process an entire batch of them (see Export to Bash scripts), you can use the tool summarize_stats to combine all those individual statistics spreadsheets into one summary file. All Bash scripts exported from SamSifter workflows that provide batch processing functionalities already execute this tool by default. The resulting spreadsheet will again contain taxon IDs in the first column and then a bunch of columns with the final read counts for each analysed SAM file. It can be very useful to quickly screen larger collections for interesting data and compare the results between individual files.
Enriching Summaries with External Databases
Often a cryptic taxon ID is not sufficient to identify interesting entries in a filtered SAM file. One example is additional information like species names in English and Latin, host organisms or associated diseases that may be useful for a filter workflow that screens metagenomic samples for human pathogens.
The tool enrich_summary combines SamSifter’s statistical summaries with any CSV file or database dump containing this additional information. It is included in SamSifter, but is not executed by default as the required data and settings will differ from use case to use case.
One potential source for such a database dump is the IMG/M database, but in theory all text dumps from arbitrary databases are supported. enrich_summary expects the database dump in a tab-delimited CSV format with column headers. By default it searches for a column named NCBI_ID and assumes that this column contains NCBI taxon IDs that match to those used in the first column of the SamSifter summary file. Of course this index column can be changed with a command-line option: --index my_taxon_id will look for a column called my_taxon_id instead. By default the tool sorts the new, enriched spreadsheet using a column called Genome_Name, but this sort field can also be modified using the --sort my_species_name command-line option to sort by my_species_name instead. The advantage of sorting by species name is the clustering of taxonomically related entries in consecutive spreadsheet rows, making interesting taxa, families or genera a lot easier to detect by visual inspection.
A complete example related to the aforementioned screen of metagenomic samples for human pathogens is the following command:
enrich_summary --input samsifter.summary.csv --database imgm_database.txt --index 'NCBI Taxon ID' --sort 'Species' > samsifter.summary.enriched.csv
Here the --input SamSifter summary file is enriched with data from the --database IMG/M using the --index column called NCBI taxon ID and sorted by --sort column Species. The results are written to a new CSV file. If you have any doubts about the spelling or meaning of any of these options you can always use the built-in help function by calling this tool (and any of the other tools included with SamSifter) with the option -h or --help to show the help text with useful explanations.
See also
https://img.jgi.doe.gov/cgi-bin/m/main.cgi for the IMG/M database on Integrated Microbial Genomes with Microbiome Samples, which provides rich but uncurated annotations for microbial sequencing data. The integrated Genome Search functionality allows downloads of customized database exports.